Introduction
Among all details in wool felt pet replicas, nothing matters more than the eyes. Eyes breathe life into the creation, shaping its personality and emotional connection. When done right, the result is a pet that feels alive, capturing the soul of the companion it represents.
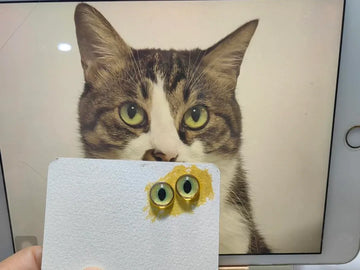
In this tutorial, I will guide you through the complete process of crafting realistic pet eyes — from choosing the correct glass cabochon, preparing the iris, applying sealing layers, to drawing delicate pupils. These steps are the same principles we apply in professional custom stuffed animal replicas, where every detail counts.
Step 1: Choosing Glass Cabochons
The foundation of a realistic eye lies in the cabochon. The most common sizes are 12mm, 14mm, and 10mm. Out of these, 12mm is typically the go-to size for cats and medium-sized dogs, while smaller pets may require 10mm.
However, beware of common pitfalls when sourcing cabochons:
- Asymmetry: An uneven dome shape leads to light refraction issues and warped reflections.
- Scratches: Even tiny scratches on the surface ruin clarity and reduce realism.
- Impurities: Internal bubbles or dust particles trapped inside make the glass appear cloudy.
Only select cabochons with perfect refraction and no defects. It’s heartbreaking to waste hours of painting and sealing only to find the base material flawed.

Step 2: Painting the Iris Base
Once you have the cabochons, the next step is painting the iris. The backing material is crucial, and two common options are:
- Watercolor Paper: Thick, textured, and stable. Prevents warping and allows smooth layering.
- Pearlescent Photo Paper: Can add shimmer but often wrinkles, making it less reliable.
In this example, I chose solid color painting for simplicity. For advanced effects, artists often use acrylics to create gradients and depth, especially for pets with unusual eye colors such as blue merle or golden hues.
Pro tip: Always cut the paper slightly smaller than the cabochon’s back, ensuring it fits snugly and avoids edges sticking out.

Step 3: Selecting a Sealer
After painting, you’ll need to seal the iris to protect the colors. I tested both UV resin and tempered sealers, and found tempered sealers work much better:
- They cure faster, reducing waiting time.
- They release less odor, unlike UV resin which can be overwhelming.
- They minimize bubble formation, keeping the surface clear and smooth.
When I used UV resin, I wasted a lot of time fighting bubbles and fumes. Tempered sealers gave me reliable, clean results every time.
Step 4: Drawing the Pupil
The pupil is the soul of the eye. A shaky line or unbalanced circle can completely change the expression of your pet replica. While there are circle tools available to help, steady hand practice is still the best way to achieve natural results.
Here are some useful tips:
- Use a fine-tip brush or pen for maximum control.
- Work slowly and avoid rushing — precision matters more than speed.
- Test on scrap paper before applying directly on the iris.
Pro tip: Once the pupil is complete, apply a quick coat of sealer immediately. This locks the design in place and prevents accidental smudging during later layers.

Step 5: Layer Drying Process
If there’s one golden rule in eye-making, it is this: every single layer must dry fully before moving to the next.
If you rush the drying process, the pigment may smear, the sealer may cloud, and hours of work can be wasted. Be patient and allow each layer the proper curing time, especially when using sealers or paints that may look dry but are not fully hardened.
Drying time can vary depending on the material:
- Acrylic paints: Typically 20–30 minutes, but longer for thick layers.
- Tempered sealers: Fast-curing, but still allow a few hours for complete hardness.
- Watercolor pigments: Dry quickly, but need additional sealing.
Patience here makes the difference between an average eye and a stunning, lifelike one.

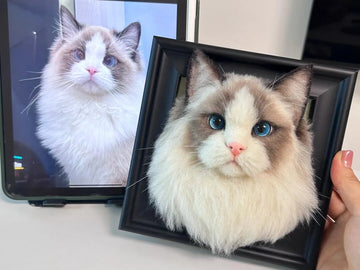
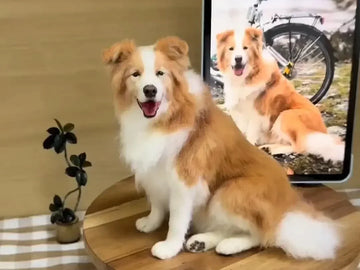
Why Eyes Are So Important in Pet Replicas
When crafting lifelike pet replicas, the eyes carry emotional weight. A pet’s gaze conveys love, loyalty, and connection. If the eyes are flat or poorly made, even the most carefully felted body will look lifeless.
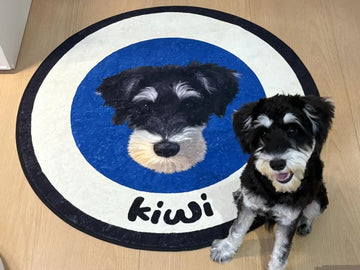
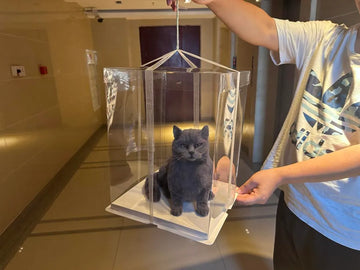
At PetDecorArt’s custom stuffed animal portraits, the eyes are given special attention. This is why customers often feel that the replicas “look back” at them, evoking strong memories and emotions.
Whether you are making your own DIY pet replica or commissioning one, always remember that the eyes define the soul of the piece.

FAQ
Which size cabochon is best for cats and dogs?
12mm is the most commonly used size for cats and medium dogs. Smaller breeds or miniatures may need 10mm, while large dogs may require 14mm.
Can I use UV resin instead of tempered sealer?
You can, but UV resin often produces bubbles and has a strong odor. Tempered sealers are faster, cleaner, and generally more reliable.
How do I make the eyes look more realistic?
Blend multiple iris colors, ensure perfect symmetry, and practice drawing smooth, steady pupils. Always reference real pet photos to guide accuracy.
Is this method beginner-friendly?
Yes, but expect some trial and error. Start with simple solid-color eyes and gradually move to complex gradient irises. Each failure is a learning step toward mastery.
Where can I see examples of finished eyes in pet replicas?
You can check out PetDecorArt’s stuffed animal clones to see how realistic eyes enhance the overall piece.
Conclusion
Crafting realistic pet eyes is an art form that combines precision, patience, and creativity. By selecting high-quality cabochons, carefully painting iris bases, choosing the right sealing method, and mastering pupil drawing, you can create eyes that feel alive.
When added to a wool felt replica, realistic eyes become the highlight of the entire piece — capturing not just appearance but emotion. If you are inspired to see how professionals integrate lifelike eyes, explore our range of custom stuffed animals, where each creation is a heartfelt tribute to beloved pets.