Have you ever seen those vivid pictures of realistic needle felt animals and couldn't help but exclaim, 'This looks so real!'? Creating realistic pets out of wool doesn't rely on magic, but on solid manual skills and particularly meticulous observation. Whether you want to craft realistic cat needle felting projects, design an adorable realistic needle felt dog, or shape delicate realistic needle felted birds, this guide reveals 10 professional tips to elevate your realistic needle felting skills and capture the unique charm of your beloved realistic pet.

Master These 10 Essential Tips for Realistic Results
Tip 1: Choose the Right Wool for Realism
The foundation of any realistic pet portrait starts with the fiber—choosing the best wool for needle felting animals makes all the difference. Fine wools like Merino are superb for smooth coats and tiny details, while slightly coarser Corriedale holds sculptural shapes better. Don't just use flat colors! Mastering color blending is essential. Mix subtle shades within the same color family to mimic natural fur variation–a key step for any realistic needle felted cats or dogs. Think beyond the base color, and include undertones for depth.
Tip 2: Use a High-Quality Reference Photo
You can't create realism without a clear guide. Invest time finding an excellent reference photo. Crucial elements? Good lighting that shows form (natural light is best) and multiple angles if possible, especially for complex poses. Search terms like "needle felting animal reference photo tips" yield great resources. Free stock photo sites (like Unsplash, Pexels) often have good animal shots, by carefully studying reference photos, you'll be better able to accurately replicate the animal's form, whether you're making a realistic needle felt cat project or a realistic needle felt dog project.
Tip 3: Start with a Strong Wire Armature (For Sculptural)
For animals meant to stand or hold dynamic poses, skipping an armature is a recipe for floppy disappointment. A wire skeleton provides essential support and allows for precise positioning of limbs, tails, and heads. Learn "how to make a needle felted animal armature". Simple techniques involve twisting aluminum or armature wire, forming the basic body shape (head, spine, limbs), and firmly securing it into a base before adding wool. Solid wool works best only for very small, simple shapes lying down.
Tip 4: Layer Wool for Natural Fur Texture
Avoid the "solid wool blob" look! Achieving realistic needle felting fur texture relies on layering. Start with a firm core shape. Then, add thin wisps of wool in the direction the fur grows on the actual animal. Use directional needling (stroking the needle along the wool direction) for longer fur areas, and shorter, controlled stabs for denser undercoats. Vary the length of your surface fibers – it makes a huge difference in realism.
Tip 5: Pay Attention to Proportions
This is where many projects start looking "off." An oversized head, stubby legs, or misplaced ears instantly break the illusion. Constantly compare different parts of your sculpture to your reference photo. Use simple measuring tricks – the head might be X times the body length, the eye position is halfway down the head, etc. Focusing on accurate realistic animal proportions needle felting is non-negotiable. Step back frequently and assess.
Tip 6: Add Subtle Color Variations
Real fur isn't monochromatic. Look closely at your reference: shadows, highlights, and different tones on the belly, back, or around the muzzle. This is where "how to blend wool for needle felting" becomes vital. Pre-blend small amounts of wool in a slightly lighter/darker/different hue before applying. For ultra-fine details like whisker spots or nose shading, carefully applied pastels or diluted fabric dyes can add incredible depth without adding bulk.
Tip 7: Focus on the Eyes & Nose
The face makes the connection. For eyes, glass eyes offer instant shine and depth, but well-executed felted eyes using tightly packed, layered wool and tiny pupils can be equally captivating – research "realistic needle felted animal eyes". For noses, especially on dogs and cats, a slightly wet-felted technique (using a tiny drop of soapy water and very fine wool) can create a smoother, shinier texture that looks authentic.
Tip 8: Use Specialty Needles for Detailing
Not all felting needles are equal! Coarse needles (like 36g) are great for initial shaping and fast wool attachment. Move to medium (38g) for general work. The secret weapon for realism? Fine star or spiral needles (40g, 42g). These are the "best needles for detailed needle felting". They make smaller holes, allowing you to refine tiny features like claws, nostrils, ear tips, and fine fur lines without damaging delicate work. Work slowly and vertically to avoid snapping these finer needles.
Tip 9: Patience & Slow Building is Key
Rushing is the enemy of realism. Trying to add too much wool too quickly results in a dense, hard, lumpy surface that lacks nuance. Work slowly, adding tiny amounts of wool at a time. Firm up each layer before adding the next. Take breaks! Coming back with fresh eyes helps you spot areas needing refinement. This meticulous approach is what separates a cute felted shape from a breathtaking realistic pet.
Tip 10: Practice with Smaller Projects First
Jumping straight into a complex realistic cat needle felting masterpiece can be discouraging. Start small! Practice the core techniques – shaping, proportions, fur texture – on simpler subjects. Realistic needle felted birds (like robins or sparrows), mice, or even simple sitting kittens are fantastic beginner projects. Analyze your work critically after each one: What worked? What looks unnatural? This focused practice on "how to make realistic needle felted animals" through smaller steps builds essential skills and confidence.
Troubleshooting: "Why Does My Felted Animal Look ‘Off’?"
l Lumpy/Uneven Shape? You likely added wool too fast or didn't firm the core enough. Go back to a finer needle and gently stab the lumpy area to compact it. Add thin layers over the top.
l Fur Looks Flat/Unnatural? Review Tip 4! Ensure you are adding thin wisps in direction and varying fiber length. More layers = more dimension, which is especially crucial when attempting detailed work like needle felting realistic cat projects. Consider if your wool choice was too coarse for the desired effect.
l Proportions Wrong? Constantly measure against your reference during the build, not just at the end. It's easier to add small bits than remove large chunks.
l Features Lack Definition? Use those fine detailing needles (Tip 8)! Don't be afraid to carefully needle specific areas more to refine edges (eyes, ears, muzzle).
Mastering realistic needle felting takes dedication, but the joy of creating a lifelike wool companion is unmatched! Remember these tips, embrace the process, and keep practicing.
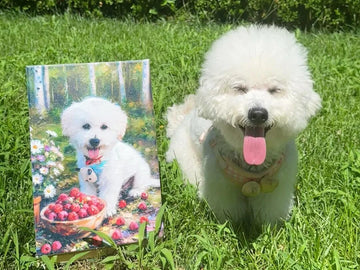
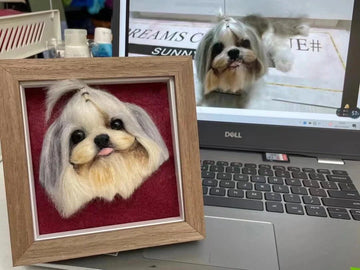
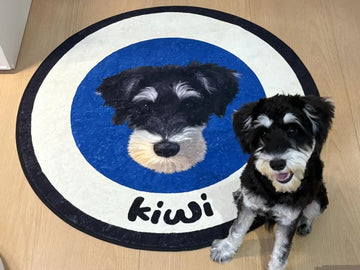
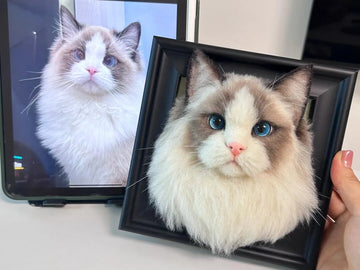
Short on time or dreaming of an heirloom piece? Let our skilled artists capture your pet's unique personality in an exquisite custom wool needle felt pet portrait. Explore our gallery and commission your own truly realistic pet portraits at PetDecorArt. We specialize in transforming your beloved companion into a timeless wool sculpture.

Conclusion
Getting truly realistic results with needle felting takes practice, but wow – is it rewarding?
Don’t get discouraged if your first few attempts feel clumsy. Every needle prick teaches you something. Stick with these core techniques: observe closely, build slowly, and refine those tiny details that breathe life into wool. The moment you step back and see that little personality shining through? That’s pure magic. It’s not just craft, it’s capturing a spark. For more in-depth guidance, explore resources on how to needle felt realistic animals.
Dreaming of a masterpiece but short on time? Our artists pour that same obsessive attention into every custom wool needle felt pet portrait. See how we transform love into wool at PetDecorArt.