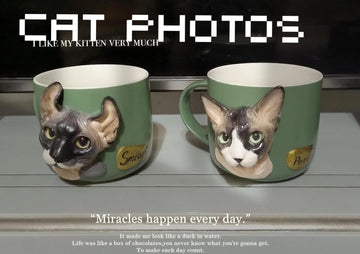
Ordinary mugs are forgettable. But a custom pet portrait mug is personal, vibrant, and emotionally timeless—especially when it’s sculpted by hand and finished with luxurious oil-style painting. In this comprehensive tutorial, you’ll learn how to design, sculpt, bake, paint, and seal your very own pet portrait mug. Whether you’re creating a heartfelt gift or a piece of everyday art for yourself, this project brings your pet’s spirit to life in three dimensions.
This is not a simple print-on-demand project. You will be working with premium polymer clay, high-precision tools, acrylic paints, and sealing techniques used by professional artisans. By the end, you’ll hold in your hands a fully functional, waterproof mug adorned with a miniature 3D sculpture of your pet—something that will brighten your mornings and melt your heart for years to come.
Table of Contents
- 1. Understanding the Concept of 3D Oil Painting Mugs
- 2. Tools and Materials You’ll Need
- 3. Planning Your Pet Portrait Design
- 4. Sculpting the Portrait in Polymer Clay
- 5. Baking and Hardening the Sculpture
- 6. Painting with Acrylics for an Oil-Style Finish
- 7. Sealing and Waterproofing the Artwork
- 8. Mounting the Sculpture Back onto the Mug
- 9. Finishing Touches, Care & Safety Tips
- 10. What Makes a Professional Custom Pet Portrait Mug
- FAQ
- Conclusion
1. Understanding the Concept of 3D Oil Painting Mugs
Before diving into clay and color, it’s important to understand what makes this kind of mug so special. Unlike printed mugs that simply display a flat image, 3D oil painting mugs are fully sculpted and hand-painted artworks. Each pet’s portrait is raised from the mug’s surface, giving it depth and tactile presence.
When people run their fingers over the fur textures or see the hand-brushed glints in their pet’s eyes, they experience something profoundly personal. These mugs aren’t just drinkware—they are functional memorials, sentimental keepsakes, and emotional art objects. Because they are baked, sealed, and waterproof, they can be safely used daily while still looking like miniature gallery pieces.
Every pet portrait mug is unique, both technically and emotionally. This tutorial will walk you through each technical stage while also giving design and emotional storytelling tips, so your piece resonates on a personal level—not just visually.

2. Tools and Materials You’ll Need
Gathering quality materials up front ensures your finished mug will last for years without cracking, fading, or losing detail. Here’s a full checklist:
Clay & Sculpting Tools
- Belgian white polymer clay (smooth, strong after baking)
- Talcum powder (prevents sticking during sculpting)
- Sculpting toolkit (needle tool, ball stylus, rubber shapers, spatula)
- Cutting blade or craft knife (for clean edges)
Painting & Finishing
- Acrylic paints (artist-grade for rich color and lightfastness)
- Assorted brushes (tiny detail brushes, flat shader brushes)
- Clear acrylic varnish or polyurethane sealant (food-safe)
- Palette, water jar, paper towels
Mounting & Baking
- 401 industrial adhesive (high-strength bonding)
- Aluminum foil sheets (protect mug during baking)
- Convection oven (with temperature control)
Base
- Plain ceramic mug (9cm tall, 400ml capacity recommended)
3. Planning Your Pet Portrait Design
Great results start with thoughtful design. You’re not just sculpting a generic dog or cat—you’re capturing your pet’s essence. This means planning proportion, composition, and even emotional expression before you touch the clay.
Gather Visual References
- Choose 3–5 high-resolution photos of your pet from different angles (front, profile, 3/4 view).
- Highlight signature traits: one floppy ear, a unique marking, eye shape, or a crooked smile.
- Pick a single dominant pose: usually a headshot works best for mugs.
Sketch the Layout
- Print a side-view template of your mug and sketch your portrait on it.
- Ensure no part of the sculpture protrudes beyond 0.8 cm for safety.
- Mark color zones (fur, eyes, nose) as a painting guide later.
💡 Pro Tip: Simpler compositions are stronger visually on a small canvas like a mug. Focus on facial expression over full-body detail unless you’re highly experienced.
4. Sculpting the Portrait in Polymer Clay
This is the heart of the process—where your pet starts to take shape in 3D. Work slowly and patiently. Clay records emotion; rushed energy will show in your details.
Prepare the Work Surface
- Dust your table with talcum powder to prevent sticking.
- Place your clean mug upright and stable.
Build Basic Forms
- Start with a round ball for the skull and gently press it on the mug’s surface.
- Add cylinders for the muzzle, cones for ears, and small beads for eyes.
- Blend the seams using a rubber shaper dipped in a touch of water.
Add Fine Details
- Use a needle tool to texture fur directionally.
- Shape eyelids, nose ridges, lips, and any whisker pads.
- Check symmetry by rotating the mug frequently under good light.
Keep clay thickness under 0.8 cm for durability and heat safety. Once complete, rest the sculpt overnight to firm up before baking.

5. Baking and Hardening the Sculpture
Baking polymer clay correctly is essential for durability. Improper baking causes cracks, bubbling, or brittleness.
Baking Instructions
- Cover the sculpture gently with aluminum foil (prevents surface burning).
- Preheat oven to 150°C for 10 minutes.
- Lower to 120°C and bake for 20 minutes.
- Turn off the oven and allow full cooling inside to room temperature before removing.
⚠️ Don’t rush cooling. Sudden temperature change can fracture thin details like ears or whiskers.
---
6. Painting with Acrylics for an Oil-Style Finish
Painting is where your sculpture truly comes alive. This is where flat clay transforms into a vibrant likeness, capturing your pet’s warmth and personality. Acrylic paints are perfect because they are water-based, fast-drying, and offer intense pigment that mimics the richness of oil painting when layered skillfully.
Preparing the Surface
- Lightly sand the baked clay with ultra-fine sandpaper (optional, for smoothness).
- Wipe away dust with a clean cloth.
- Apply a thin coat of acrylic gesso as primer to help paint adhere evenly.
Building the Color Layers
- Start with base tones: apply a thin, even color layer for the main fur area.
- Add shadows next using diluted darker hues to create depth under cheeks, around eyes, and inside ear folds.
- Dry-brush highlights on raised areas (forehead, nose bridge, fur tips) with lighter tints.
- Use tiny detail brushes for eyes, nose, and mouth—capture light reflections with pinpoint white dots.
Tips for a Painterly Oil Look
- Layer many thin coats rather than one thick one—this mimics the luminous build of oil paint.
- Let each layer dry completely to avoid muddying colors.
- Use soft, feathery strokes to blend fur direction for realism.
💡 Pro Tip: Step back every 10 minutes. Seeing from a distance helps spot symmetry and color balance issues before they set.
7. Sealing and Waterproofing the Artwork
Once the paint has fully dried (at least 24 hours), sealing protects your artwork from moisture, scratches, and fading. It also gives your sculpture a subtle sheen that enhances color depth.
How to Seal
- Choose a clear, non-toxic, food-safe varnish or polyurethane sealant.
- Apply 2–3 very thin coats with a soft brush, allowing each coat to dry thoroughly.
- Optionally bake at low heat (100°C for 10 minutes) to harden the sealant layer.
This waterproof layer ensures your mug can withstand washing and daily use while preserving the fine detail and color vibrancy of your pet portrait.
8. Mounting the Sculpture Back onto the Mug
With your sculpture painted and sealed, it’s time to permanently attach it to the mug base.
Mounting Instructions
- Mark the original placement area on the mug with a pencil.
- Lightly sand the mug surface for better adhesion.
- Apply 401 industrial-strength adhesive evenly to the back of the sculpture.
- Press the piece firmly onto the mug and hold for 2 minutes.
- Allow to cure undisturbed for 24 hours for full bond strength.
Once secured, your sculpture should be seamlessly bonded to the ceramic mug and ready for regular use.

9. Finishing Touches, Care & Safety Tips
At this stage, your custom pet portrait mug is complete—but how you care for it will affect how long it stays pristine.
Finishing Touches
- Paint a soft color background behind your portrait (optional) to frame it visually.
- Add your pet’s name using a fine liner brush or metallic pen.
- Consider signing the bottom of the mug to mark your work as a keepsake.
Care Tips
- Hand-wash only using mild soap and a soft sponge.
- Avoid soaking the mug for long periods.
- Do not place the mug in a dishwasher or microwave.
- Store away from direct sunlight to prevent color fading over years.
10. What Makes a Professional Custom Pet Portrait Mug
Now that you’ve seen how it’s done by hand, it’s worth noting what makes a professionally crafted pet portrait mug stand out. At PetDecorArt, for example, each piece is not just printed—it’s sculpted and painted with the same attention to detail as a gallery commission.
Features of a Professional-Grade Mug
- High-density polymer clay baked onto ceramic for maximum durability
- Detailed 3D sculpting of fur textures, eye glint, and unique markings
- Layered hand-painted oil-style acrylic for vibrant, realistic color
- Waterproof, non-toxic materials safe for everyday use
- Optional full-body portraits or multi-pet designs
- Custom color themes to match personality (Black & White, Cream, Blue, Pink)
Each custom pet portrait mug is 9cm tall and holds 400ml, blending practicality with sentimentality. They make ideal gifts for birthdays, holidays, or memorials—art pieces you can hold every day.

FAQ
Is it safe to drink from the mug?
Yes, the clay and sealant are non-toxic and waterproof. Just avoid sipping directly from the sculpted area.
Can I put it in the dishwasher?
Hand-washing is strongly recommended. While the piece is waterproof, dishwashers can erode paint and sealant over time.
How long does a handmade mug last?
With proper care, it can last decades. The baked clay and sealed paint are extremely durable under normal use.
Can I sculpt multiple pets on one mug?
Yes! You can sculpt multiple portraits as long as you keep the combined thickness below 0.8 cm for safety and comfort.
How long does the whole process take?
Depending on complexity, expect 2–3 full days including sculpting, baking, painting, sealing, and curing time.
Conclusion
Crafting a 3D oil painting pet portrait mug is more than a DIY project—it’s an act of love. Every step, from sculpting your pet’s soft ears to painting the sparkle in their eyes, helps you celebrate the bond you share. The final result is a one-of-a-kind piece that merges art, memory, and functionality in a way no printed mug ever could.
Whether you follow this tutorial to create your own or order a professionally handcrafted custom pet portrait mug, you’re choosing something extraordinary. Each sip becomes a moment of connection, each glance a reminder of the love that brightens your life. And that is what makes it art worth holding.


