Have you ever wondered how artists transform a simple photo of a beloved pet into a shimmering 3D glass oil painting? This unique art form combines traditional oil techniques with modern layering on acrylic glass, producing lifelike depth that almost feels sculptural. In this guide, we’ll take a deep dive into the process, the tools you’ll need, and the artistry behind creating a custom pet portrait that captures not only appearance but also emotion.
Table of Contents
- 1. Introduction: Why 3D Glass Oil Painting?
- 2. Finding Inspiration & Studying Artists
- 3. Essential Tools and Materials
- 4. Laying the Foundation: Sketching the Basic Form
- 5. The Layering Technique Explained
- 6. Bringing Life Through Details
- 7. Applications Beyond Portraits
- 8. Inspiration from PetDecorArt’s Creations
- 9. Practical Tips for Beginners
- 10. Frequently Asked Questions
1. Introduction: Why 3D Glass Oil Painting?
Unlike traditional canvas portraits, a 3D glass oil painting uses transparent acrylic plates layered with oil or acrylic pigments to achieve depth. Each stroke sits on a separate “plane,” so when viewed together, the artwork gives the illusion that the pet is floating within the glass. This method is gaining popularity among pet lovers because it conveys both artistic beauty and an almost holographic presence.
In memorial artworks especially, this technique feels particularly moving: it allows the memory of a pet to appear luminous, as if glowing through the glass. Many families see this as a way to celebrate their companion’s spirit in an art form that feels alive.

2. Finding Inspiration & Studying Artists
Before starting your own work, the best approach is to immerse yourself in examples. Find an artist whose work resonates with you—someone who blends technical skill with emotional storytelling. Follow their social accounts, study their videos, and break down their process frame by frame. For instance, PetDecorArt’s oil painting series showcases how detail and layering can elevate a pet portrait into a timeless piece of art.
By analyzing these examples, you’ll start noticing how fur is layered, how light is captured in the eyes, and how small highlights bring vibrancy. It’s like learning a new language: the more exposure you have, the easier it becomes to replicate.
3. Essential Tools and Materials
The beauty of 3D glass oil painting is that you don’t need a professional studio. With just a few tools, you can get started:
- Acrylic (Plexiglass) board: Serves as the transparent base. Choose one with high clarity.
- Fine-line brush: A traditional Chinese calligraphy brush or similar works well for precision strokes.
- Acrylic paints: Though oil can be used, acrylic dries faster, making layering easier for beginners.
- Palette & Mixing tray: To blend subtle fur shades and eye highlights.
- High-resolution pet photo: This will be your most important guide.
Optional but helpful tools include a desk lamp for consistent lighting, magnifying glass for detail, and a fixative spray for sealing the final layers.
4. Laying the Foundation: Sketching the Basic Form
Just as with digital art, your “base sketch” provides the skeleton of the portrait. Use light pencil or diluted paint to outline the head, ears, and key facial features. This sketch should not be overworked; its purpose is to ensure proportions are correct before you begin layering.
Pro tip: Place a printed photo beneath the acrylic plate to trace the main outlines. This ensures accuracy and reduces guesswork, especially for beginners.

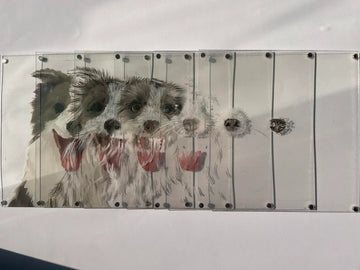
5. The Layering Technique Explained
This is where the magic happens. Think of your glass as a series of Photoshop layers. Each stroke you add is placed in a way that interacts with the transparency of the material:
- Layer 1 – Base Color: Start with a wash of background color. This sets the overall tone (warm or cool) of the portrait.
- Layer 2 – Initial Fur Strokes: Lightly block in fur direction and volume.
- Layer 3 – Eyes: The soul of the portrait. Add them early so you can build around their light and expression.
- Layer 4–6 – Refinement: Gradually deepen colors, add shadows, and refine whiskers, noses, and ears.
Each layer should be allowed to dry before proceeding to the next. Rushing will muddy the colors and reduce clarity.

6. Bringing Life Through Details
Once the base layers are complete, it’s time to elevate the portrait from “flat image” to “living memory.” The secret lies in micro-details:
- Fur Texture: Use short, directional strokes to mimic hair growth. Vary brush pressure to simulate thick versus fine strands.
- Nose & Mouth: Add subtle highlights on the moist surface of the nose. For mouths, tiny shadow lines help define expression.
- Whiskers: Reserve pure white or very light paint for whiskers. Paint them confidently with a single stroke for realism.
- Eyes: Layer glazes to capture translucency. A final white dot of reflection is crucial—it’s what makes the eyes sparkle with life.
This stage is time-consuming but deeply rewarding. Many artists find themselves connecting emotionally here, as each brushstroke brings back memories of a pet’s unique quirks and expressions.
7. Applications Beyond Portraits
Though pet portraits are the most popular use of 3D glass oil painting, the technique extends far beyond. Artists also apply it to:
- Wildlife Art: Capturing birds, horses, or exotic animals with the same layered vibrancy.
- Botanical Themes: Flowers rendered in layers appear as though they’re blooming inside the glass.
- Abstract Works: Playful color layers create a floating, kaleidoscopic effect.
For pet lovers, this opens the door to combining pets and settings—a dog in a meadow, a cat by a window—where each element exists on a different transparent plane, enhancing depth.
8. Inspiration from PetDecorArt’s Creations
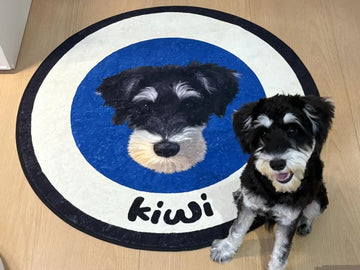
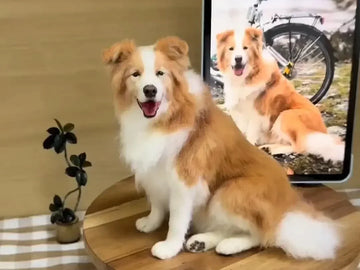
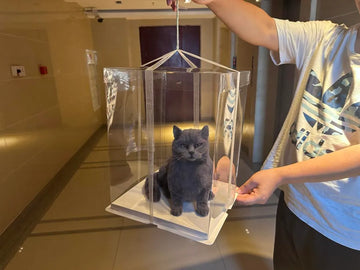
PetDecorArt has embraced this technique in several remarkable ways. For instance, the Custom 3D Oil Painted Pet Portrait on Glass transforms a simple photograph into layered artistry, perfect for display in natural light where the glass shimmers.
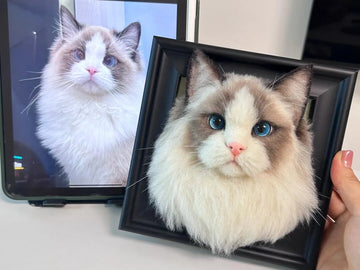
They also offer variations such as the Custom Pet Photo Frame Painting on Glass, which integrates the portrait with elegant framing, and the Oil Painting Phone Case, which brings traditional art into everyday use. By exploring these, you can see how the principles of layering translate into diverse objects that combine practicality with sentiment.

9. Practical Tips for Beginners
Getting started can feel intimidating, but remember: every great artist started with a first imperfect piece. Here are some practical suggestions:
- Start Small: Practice with a small 10x10cm acrylic plate before tackling larger projects.
- High-Res Reference: The clearer the photo, the more detail you’ll capture.
- Lighting: Paint under steady, bright lighting to judge transparency properly.
- Drying Patience: Rushing layers causes smudging. Allow each one to cure fully.
- Learn from Mistakes: Acrylic glass allows scraping off dried errors with a razor blade—don’t fear corrections!
Over time, these small adjustments will refine your skill and help you capture not only likeness but personality.
10. Frequently Asked Questions
How long does it take to complete a 3D glass pet portrait?
For beginners, expect 10–20 hours spread over several days. Experienced artists may complete a piece in less time, but the drying stages always require patience.
Do I need to use oil paints specifically?
No. Acrylic paints are often preferred for their faster drying times, but oils offer richer blending. The choice depends on your comfort and desired finish.
Will the paint peel off the acrylic over time?
When properly primed and sealed, acrylic boards hold paint securely. Adding a final varnish or fixative increases durability.
Can I commission a professional if I’m not confident in my skills?
Absolutely. Many choose to order a handmade piece from professionals like PetDecorArt’s oil painting series, where skilled artists ensure the final product reflects your pet faithfully.
3D glass oil painting merges artistry and memory. Whether you create it yourself or commission from professionals, the result is a glowing tribute that brings your pet’s presence back into your daily life.