Tired of generic home decor that lacks personality? Want to create meaningful gifts that actually spark joy? Or simply need a new way to unwind after work? Let me introduce you to wool felting – the craft that's equal parts addictive and therapeutic!
While needle felting beginners often start with basic shapes like fruits or mushrooms, the real fun begins when crafting 3D pet portraits. Picture this: sculpting a fuzzy twin of your furry BFF that captures their quirks perfectly. It’s not just a keepsake – that wooly doppelgänger might even trick your cat into thinking they’ve got competition!
This needle felting for beginners covers everything from essential tools to rookie mistakes. Follow these needle felting tutorials and you’ll save enough wool to make a whole flock of sheep! Bookmark this now – you’ll thank me later.
What Is Wool Felting?
Here’s the scoop: How does needle felting work? You’re basically taming fluffy wool clouds into solid shapes using special barbed needles. Sounds simple? Wait till you experience the ASMR-like satisfaction of watching loose fibers transform under your hands – it’s more relaxing than petting a purring kitten!
Unlike knitting or crochet, this is 3D sculpting with nature’s coziest material. Through thousands of strategic pokes using how to felt with needle techniques, you’ll compact wisps of wool into durable, huggable creations. It’s like giving clouds a personality makeover – pure crafting therapy!
Starter Kit for Crafting Newbies
Don’t get overwhelmed by fancy terms. You really only need three basics:
l Felting needles (Thick ones for shaping, slim ones for details)
l A foam pad (Save your table – and needle tips!)
l Quality wool (Australian Merino = beginner’s BFF)
Pro tip: Opt for needles with ergonomic grips – your hands will survive marathon crafting sessions!
For upgrades, glass eyes and wire armatures are nice, but get creative first! That old makeup sponge? Perfect core material. Takeout insulation bags can be the instant portable workstation hack. The following are some common tools, if you are interested in them then you should quickly understand.
1. Felting Needles
-38G Medium Gauge: For shaping cores (like a cheetah’s muscle tone).
-40G Fine Gauge: For details (whiskers that could cut glass).
-Pro Tip: Cheap needles snap like twigs. Invest in Titanium Set—they’re the Wolverine claws of felting tools.
2. Wool Types
|
Type |
Best For |
|
Corriedale Core |
Bulky bases (think chonky cat bellies) |
|
Merino Top |
Smooth fur textures |
|
Novelty Blends |
Eyeballs, noses, toe beans |
3. Work Surface
Foam Pad: Go for ≥5cm thickness—unless you enjoy stabbing your desk.
Brush Mat: It lets you feel spherical shapes without a wrestling match.
Your First Project: A Cat Face Keychain
A cat’s face is the perfect needle felting beginners project: simple shapes, forgiving details, and endless personality. Plus, who can resist a pocket-sized feline charm? Follow this guide to create a woolly companion that doubles as a keychain!
Step 1: Create the Base Shape
1. Pull a walnut-sized tuft of wool.

2. Roll it into a loose ball, then stab vertically with the coarse needle. Rotate constantly to form a flat disc (2cm diameter).
3. Science Hack: Higher stabbing density = stronger structure. Aim for 500+ stabs at this stage.
Why flat? A slightly flattened sphere mimics a cat's cheeky face contour.
Step 2: Sculpt the Ears
1. Take two pea-sized wool tufts. Shape into triangles by folding the edges inward.
2. Attach to the top of the base:
Place one triangle on the foam pad.
Stab its base 20 times with the coarse needle, then lift and attach to the main face.
3. Repeat for the second ear. Angle them outward for a curious kitten look.
Troubleshooting: If ears droop, add a hidden layer of polyester stuffing inside for support.
Step 3: Add Facial Features

Eyes:
1. Roll black wool into two sesame-seed-sized balls.
2. Press onto the face and secure with 30+ fine needle jabs.
3. Add tiny white wool highlights for sparkle.
Nose:
1. Form a pink wool triangle. Use tweezers to position it below the eyes.
2. Stab sideways around the edges to blend with the base.
Whiskers:
1. Lay 3–4 thin black wool strands diagonally from the nose.
2. Lightly stab over them—just enough to secure, not bury them.
Pro Tip: Mimic embroidery techniques by “stitching” whiskers with a single needle.
Step 4: Finishing Touches

1. Blend Colors: Dab contrasting wool on cheeks for a blushing effect.
2. Texturize: Use the fine needle to poke shallowly around ears for fur texture.
3. Reinforce: Insert an eye pin into the top center; wrap embroidery thread around it 10 times before attaching the keychain ring.
Durability Check: Tug gently on all parts. Loose areas? Stab 50+ times vertically.
4. Common Mistakes & Fixes
Lumpy Surface: Cover with a sheer wool layer and stab evenly.
Eyes Falling Off: Pre-felt small parts before attaching.
Bent Needles: Always stab perpendicularly! Tilted needles break 4x faster.
5. Level Up Your Cat-titude
Accessorize: Add a miniature bow with red wool.
Mix Textures: Blend silk fibers with wool for shiny accents.
Go 3D: Create a sleeping cat by shaping the face into a crescent moon form. For more needle felt for beginners inspiration, explore advanced tutorials online!
Fun Fact: Needle-felted items make excellent stress relievers—scientifically proven to lower cortisol when squeezed!
6. Care & Display
Storage: Keep in a dry box; humidity weakens wool bonds.
Cleaning: Use compressed air or a soft toothbrush.
Show Off: Share photos on platforms.
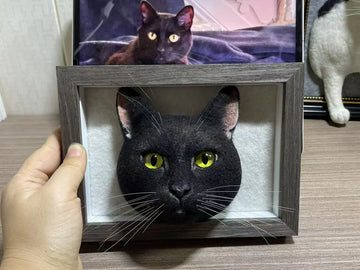
From Craft to Keepsake: When DIY Meets Heirloom
While handcrafted keychains carry charm, some moments deserve professional artistry. Imagine capturing your pet’s likeness in wool—every whisker angle, that one crooked ear, the mischievous glint in their eyes.
PetDecorArt - Handcrafted Art, Inspired by Love
At PetDecorArt, we turn beloved pets into timeless felted sculptures. Our craftsmen combine traditional techniques with hyper-detailed precision, using ethically sourced merino wool and museum-grade materials. Whether it’s a playful kitten pose or a senior dog’s wise gaze, we freeze those fleeting memories in fiber.
Why Choose Us?
● Custom Designs: Send photos, and get a 3D wool replica.
● Durability: Military-grade felting methods ensure your creation survives adventures.
● Fast Turnaround: From photo to finished piece in 10 days - perfect for surprise gifts.
Grab your needles and let the wool magic begin! And when you’re ready to level up, remember: PetDecorArt turns love into art - one tiny stab at a time.


